Sourdough Focaccia
Welcome to the world of sourdough focaccia! Mississippi Vegan style. Now before we begin, I want to be the first to tell you that there are many different varieties of focaccia out in the world. I feel as though the more traditional style uses store-bought yeast with one type of flour, very little hands-on work, and is baked in a rectangular vessel. This creates a very light and fluffy finished sheet of bread with a light golden color- which I love. But that’s not the recipe you will find here.
My sourdough focaccia uses wild yeast (aka sourdough starter). I’ve been taking care of mine now for over 4 years! The dough is also kneaded and stretched and folded to create lots of beautiful gas bubbles which results in a lovely open crumb and chewy texture. The dough is also fermented for a long time which creates a gorgeous tangy flavor. As for the crust, I like a lot of color which equals flavor in my kitchen plus a fabulous crunch.
FOUNDATIONAL FORMULA FOR THIS SOURDOUGH FOCACCIA
The toppings possibilities are limitless with this bread. That said, there is something very satisfying about a loaf with no toppings. But sometimes I want to load it up with as many things as possible! Regardless, with this foundational formula for my sourdough focaccia, you will be able to make show-stopping, incredibly delicious bread that everyone in your life will love (and ask you to make again and again!). Also, if you are new to sourdough I think this is the perfect starting point. It’s all done in a bowl, it doesn’t require shaping or scoring, it’s easy to work with because it’s a high-hydration dough, and it is very forgiving. That’s the most important thing to remember- even if things don’t go perfectly- the results will most likely still be delicious and edible!
SOURDOUGH FOCACCIA FLOUR
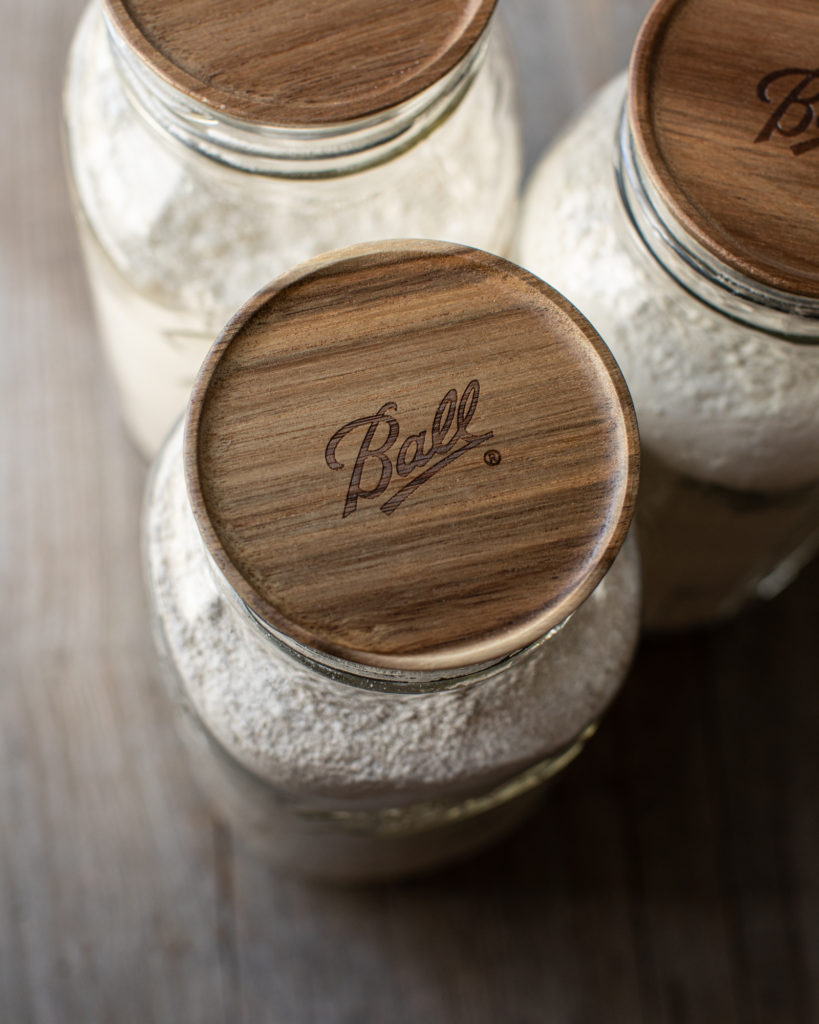
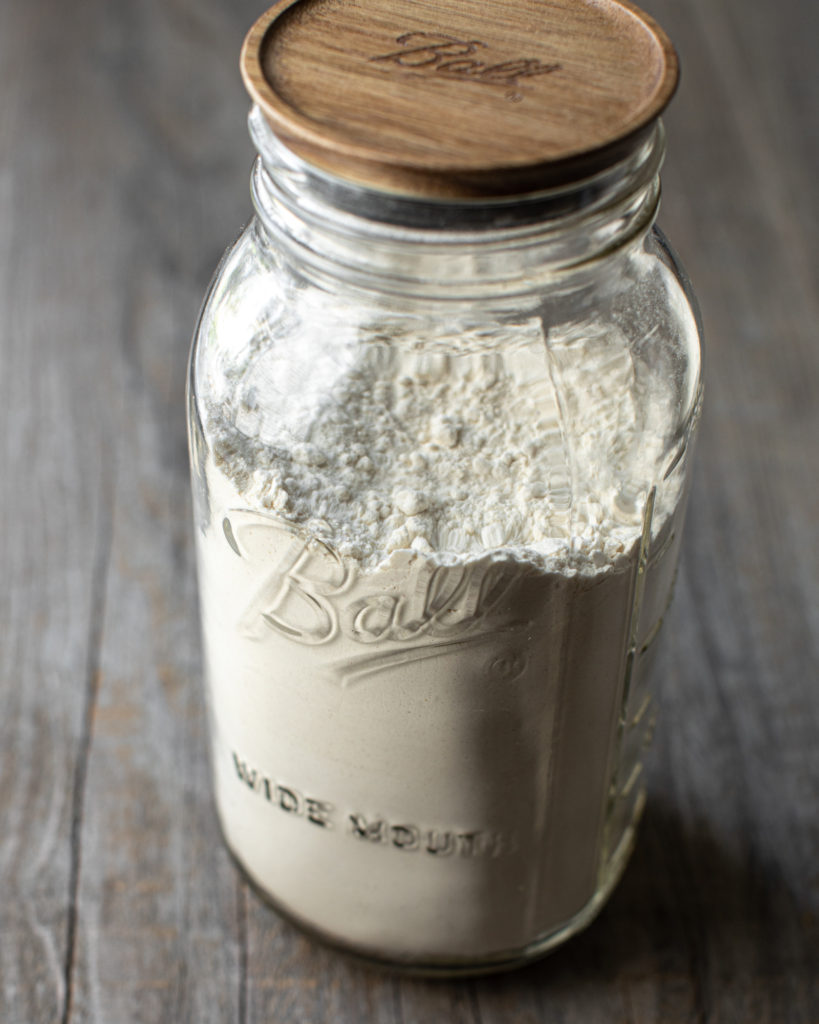
First things first, let’s talk about one of the most important ingredients for sourdough focaccia bread: FLOUR. Today I am teaming up with the makers of Ball® home canning products and I could not be more pleased about it. When it comes to making sourdough, Ball® products are an integral part of the process for me and many other bakers. Ball® jars are not only used to store my flours, but also my sourdough starters (yes, I have a few as backups!).
We’ll talk more about that in a minute but right now let’s focus on the different types of flour I recommend using for this recipe and how to store them. When it comes to flour, I like to source organic and large bags when possible. I immediately place the flour in Ball® Half Gallon Jars and use their Ball® Wooden Lids to keep the flour sealed and fresh (yes, they are airtight!). I then like to place the jars in a dark and cool place in the pantry. The Ball® Wooden Lids are made from Acacia wood and I love the look of them. They come in regular and wide mouth sizes and are stackable, too! Purchase your very own lids here.
The 3 most used flours for my sourdough focaccia in my pantry are: Bread Flour, Rye Flour and 00 Flour. I like to use all of them (and to combine them) because they all offer different characteristics to the final product.
BREAD FLOUR
Great for baking breads because it has a higher protein content which helps give the bread structure and strength. This allows for the bread to have a good rise and creates a delightful chewy texture. I particularly like using bread flour for round loaves and baguettes.
RYE FLOUR
A whole grain flour which makes it more nutrient dense and also more flavorful. You can definitely notice more of a tang and complexity in flavor to the final product if some rye is used. Because rye flour is a whole grain flour, it can result in the final bake to have less of a rise. It also does not have a smooth and bouncy texture when making dough (like with white flours). This is not necessarily a problem, but oftentimes people will combine rye flour with some bread flour to make it easier to work with. I quite enjoy a higher percentage rye loaf- especially in the morning as a nutritious and hearty toast.
00 FLOUR
A fine Italian flour that is ideal for breads and pizza. The first thing I noticed when using 00 was its elastic texture. It’s pretty wild when you compare it to rye flour dough! The final baked bread has such a fabulous squooshy chew, it’s really unlike any other flour. For this recipe, you can use ALL 00 flour which results in a super decadent, fluffy and squooshy loaf of bread. You can also combine it with bread flour if you would like to have a bit more height in the final dough and also some rye flour which can offer more flavor.
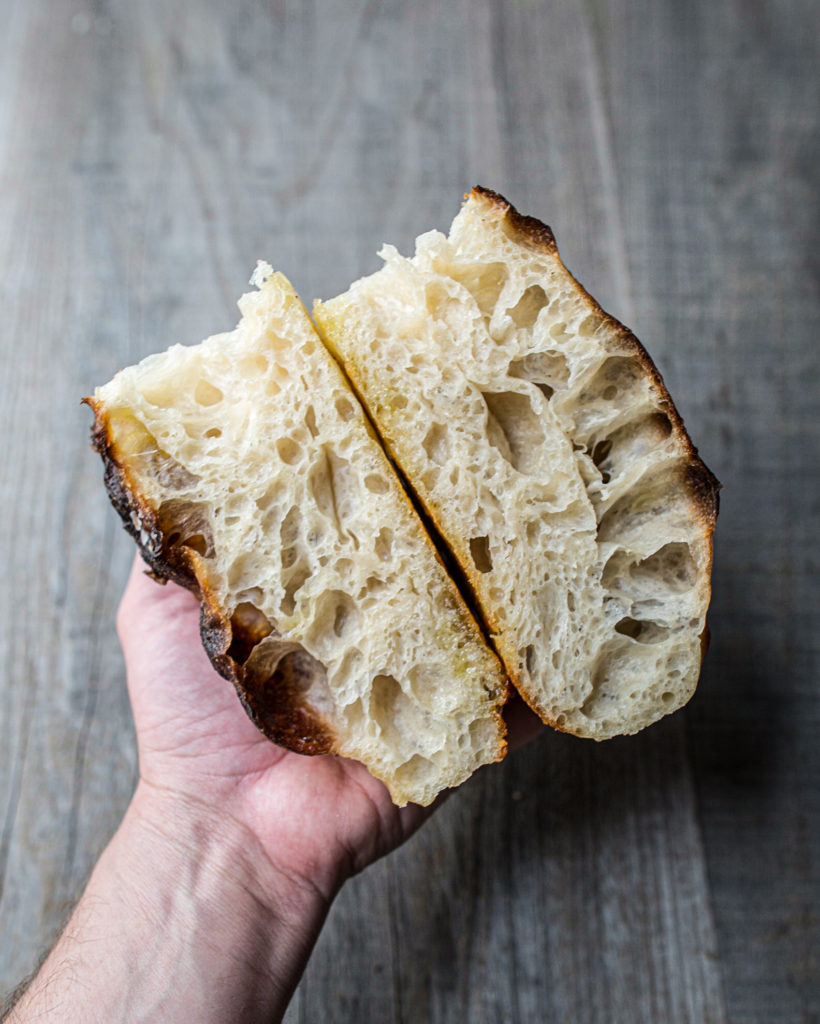
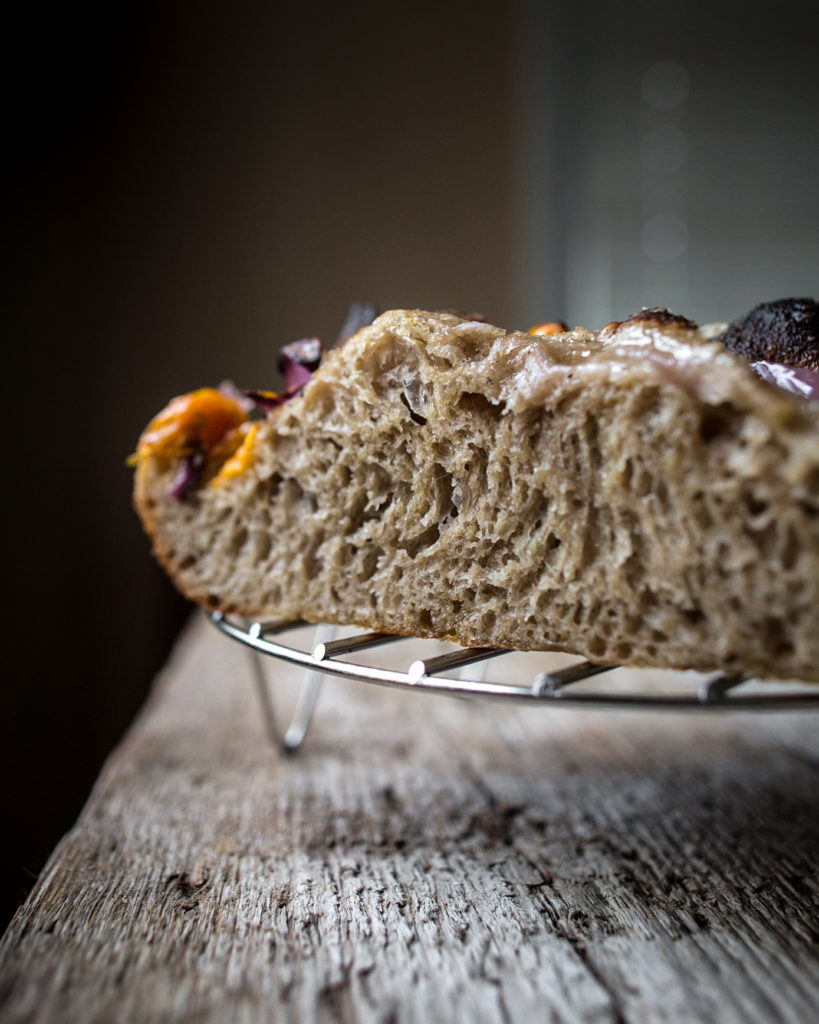
The total amount of bread called for in this recipe is 650 grams of flour. I have done SEVERAL combinations: 650 grams of total 00- very light and fluffy, 650 grams of total rye which was dense, sour, and hearty, a combination of 500 grams of bread, 100 grams of 00, and 50 grams of rye which was well-rounded in all departments. The image you see at the very top is 450 grams bread, 200 grams 00, and 50 grams of rye. Feel free to play with different combinations and see which one you like the most. I personally like to switch it up because I can’t sit still and I get bored quickly.
Please note there are many other flours to bake with as well, like: whole wheat, spelt, einkorn, and dark rye. I just wanted to go over the 3 that I personally use the most, in particular for this recipe!
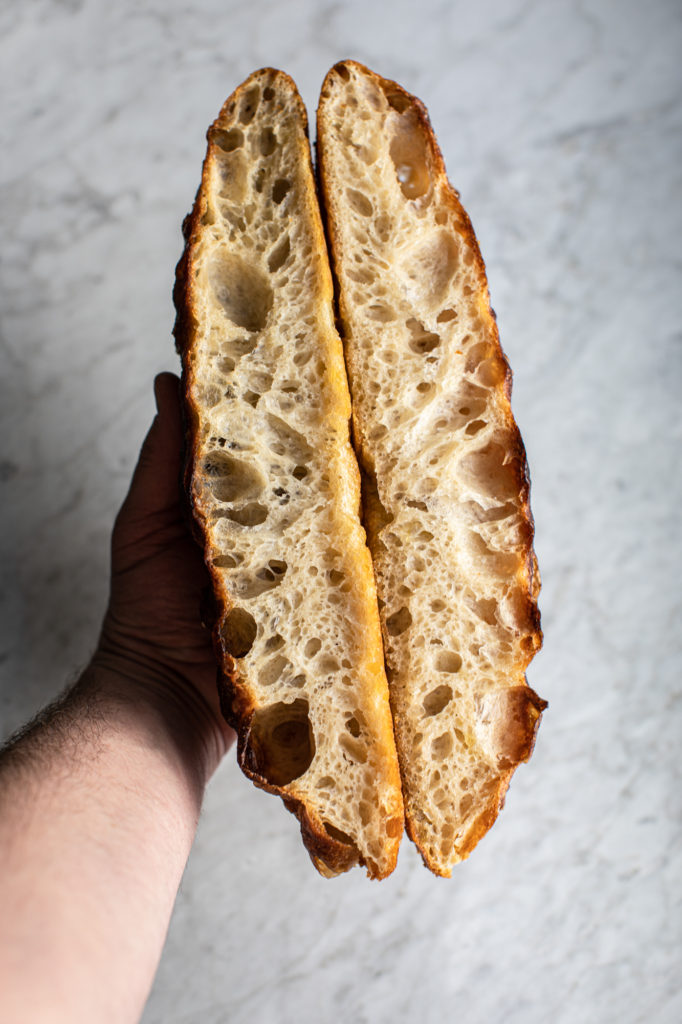
RISE & CRUMB STRUCTURE OF THIS SOURDOUGH FOCACCIA
For the left image we have a combination of 450 grams 00 and 200 grams of bread flour. Notice the fabulous rise and incredible crumb structure! To the right, I combined 200 grams rye flour and 450 grams bread flour. Notice the darker color and smaller crumb structure. The flavor is more complex and the texture is more hearty. Both variations follow the same base measurements of water, salt, olive oil, and flour but they have very different results.
SOURDOUGH STARTER
Now that we’ve talked about flour, let’s talk about the starter. First up, you will need to get you some starter. You can do this a couple of different ways. My friend Bella has an amazing blog post about how to make your own starter from scratch. You could also save some time and effort and buy some Dried Sourdough Starter from my friend Deanna. Simply add water and it will come to life.
Lastly, and this is what I did, you can source some fresh sourdough starter from a bakery or a friend. You don’t need much! I was lucky enough to have my friend Christina of Levee Baking Co. (here in New Orleans) give me some of her starter. I’ve made hundreds of bakes with Booger (you get to name your starter…) and it’s still going strong. I love how this creates a history and a story.
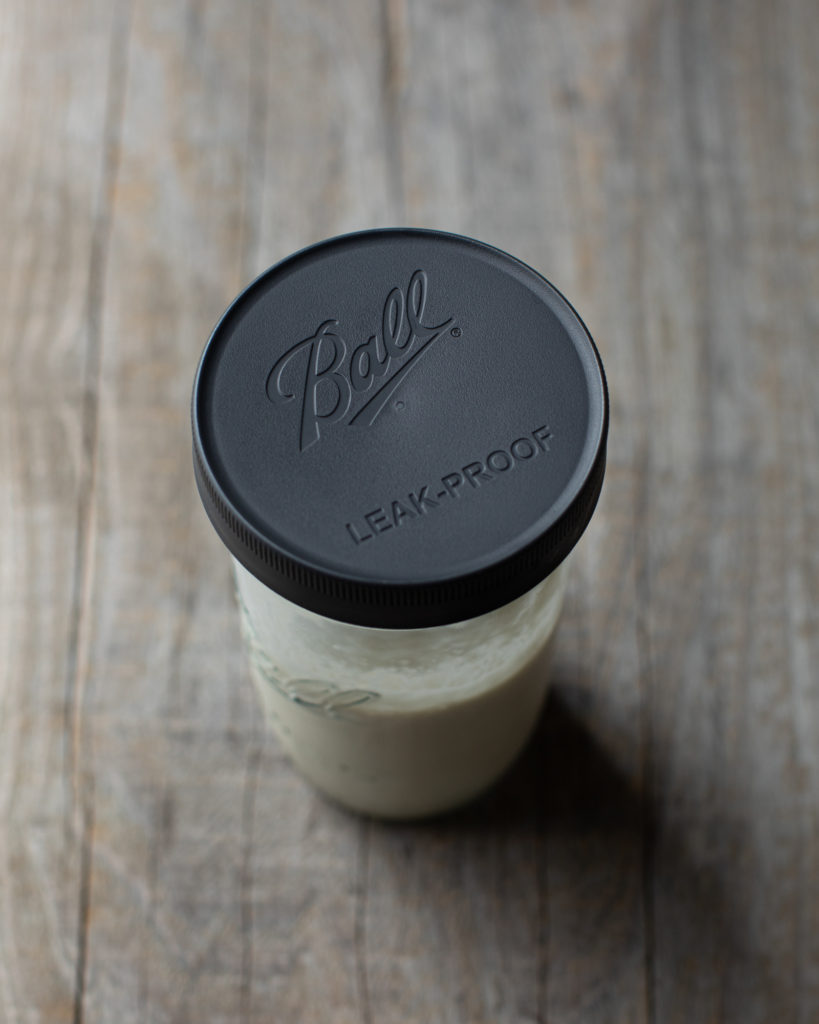
HOW TO KEEP YOUR STARTER
Now there are many different ways you can keep and use a starter but this is how I do it. I like to keep my starter in the fridge with a Ball® Leak-Proof Storage Lid. When the starter is in a cold and dark environment, it slows down and if left in there long enough, it will become completely dormant. Once you take it out, bring it to room temperature and feed it, it will become active again.
Now depending on how long the starter has been in the fridge and unused will depend on how long it takes to become active. This means if you don’t use it for a few months, it might take a whole day to come back to life! Or, if you used it a week before, it should still be a little active and will wake back up in a few hours. My best advice to anyone who wants to make sourdough is to make a loaf once a week. This keeps the starter happy and it makes you become a better bread baker.
REVIVING A CHILLED SOURDOUGH STARTER
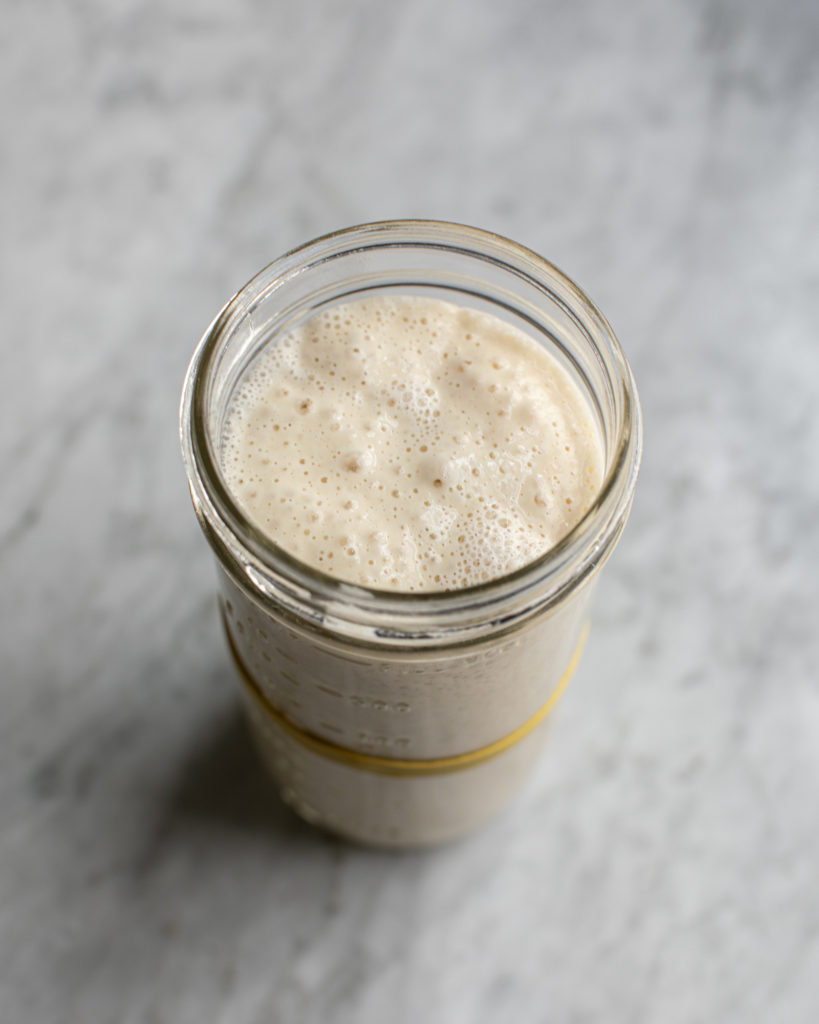
In the image above you see my chilled sourdough starter from the fridge. It has a little bit of activity (because I had used it the week before) which means that it just needs a good feeding and some warmth to get it where it needs to be. In the jar to the right, I have combined 1 cup of fresh water and 1-1/2 cups of flour. To this I add only 1 TEASPOON of sourdough starter. I’m sure there are many people out there that would say to add more but I like to add less. This gives the starter plenty of new food to feed on. After it sits on the counter for ½ a day, it will become bubbly and incredibly active.
Once I add the starter needed for the recipe (80 grams), I place the leftovers back in the fridge and get rid of the original starter by using it in another recipe. (There are countless ways to use leftover starter, simply google or YouTube the options. I personally love making little savory pancakes with it.) By placing the most recently used starter back in the fridge, you are left with one that will come back to life more quickly for your next bake. (I once took my starter out of the fridge after being dormant for 2 months and fed it. It literally took more than 24 hours to come back to life! Remember, the longer it stays unused in the fridge, the longer it takes to wake back up!)
MEASURE THE RISE
Something fun to try, once the new jar of starter is fed and left on the counter, is to add a rubber band around the jar to show the starting point. This way you know exactly how much it’s grown. Once the starter has doubled in size and has risen high, it is ready to bake! Do note, you want to use the starter when it’s at its peak. If it rises and then falls, this could affect the final results of the bake. Keep an eye on it and try to use it when it looks like it’s growing, thriving, and at its maximum height.
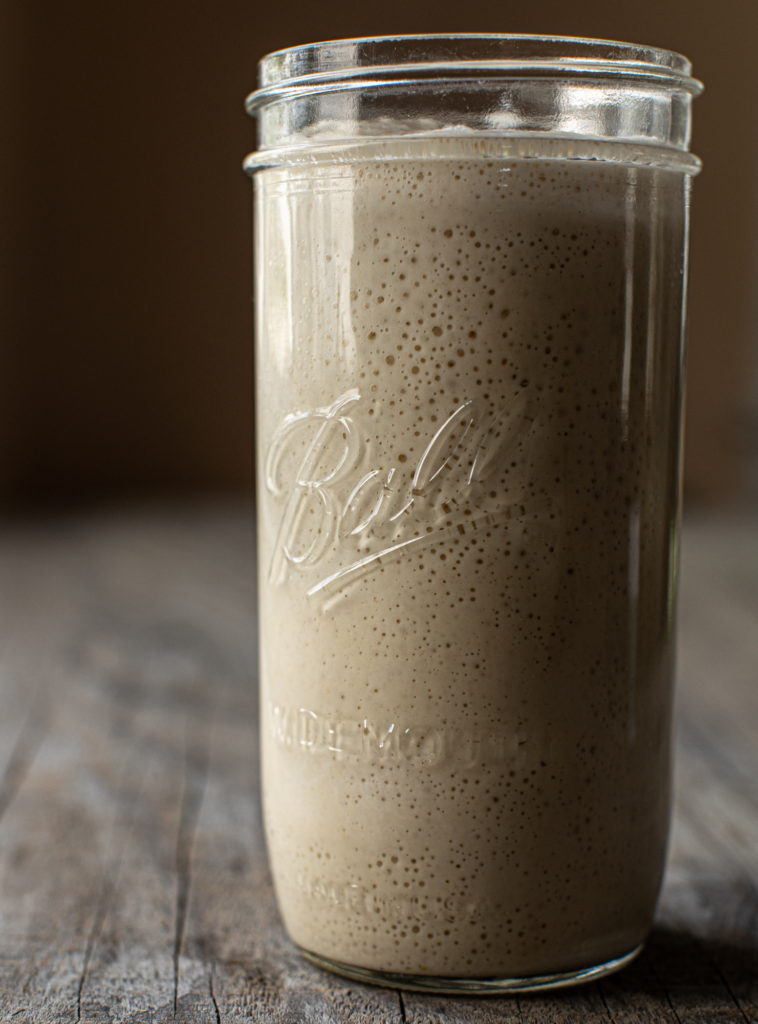
A GOOD, STRONG STARTER
Now THAT is a strong sourdough starter. Look at those bubbles! The rise! I’m here for it. Once you use 80 grams for your loaf of focaccia, you can also make delicious sourdough starter pancakes or incorporate this into so many different things. Once your starter looks like this, you are ready to start making the dough. Keep in mind, this is all about timing. If the starter is looking like it’s getting close, go ahead and start the process of autolyse (mixing the dough and water together). That way you can use the starter at its maximum potential. Please note the Ball® Wide Mouth Pint Jar that I am using here. It’s my go-to size for activating and storing sourdough starters.
Now that we have gone over flour and the sourdough starter, I want to go through the steps of making this dough. I will be rolling out corresponding video content to help further explain and show all of the details but, for now, I just have written words and images. I have also linked some external videos that I think will be helpful, as well, for the time being.

AUTOLYSE
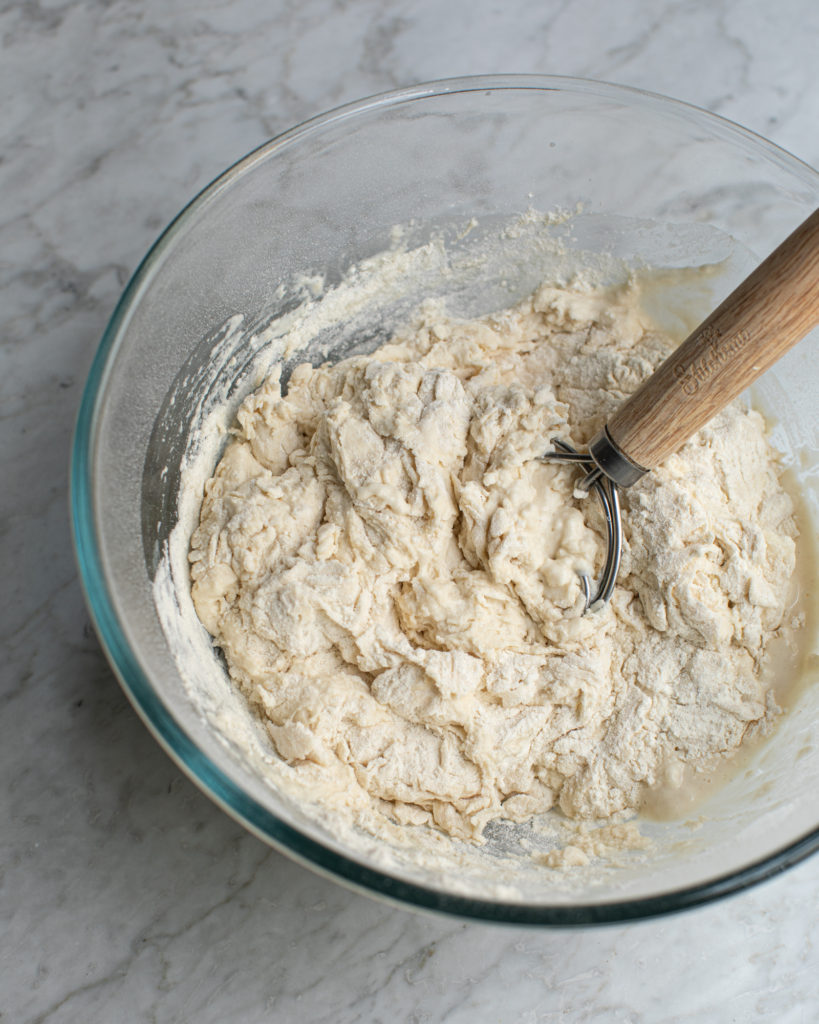
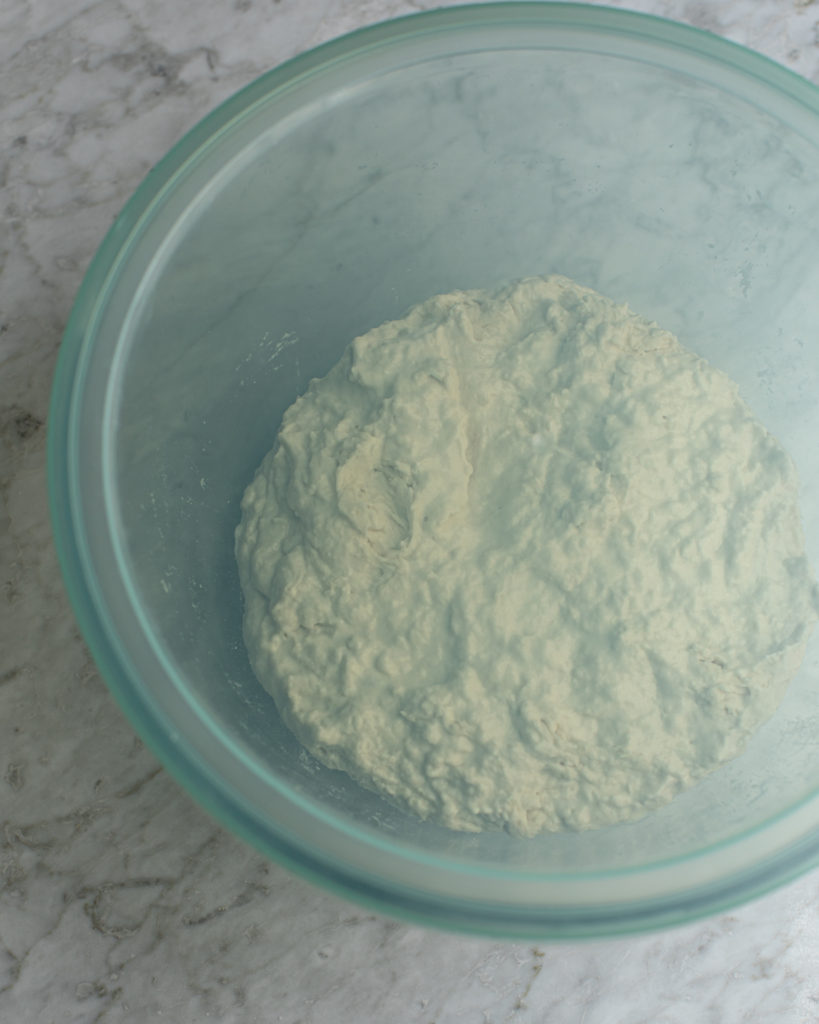
Once the starter is active, the next big step to making this sourdough focaccia base is a term called AUTOLYSE. This is the time when the flour and water get to hang out and meet each other! This step is important because it will allow the dough to become smooth and pliable. Some would say 20 minutes is long enough but I personally like to give it 45 minutes to 1 hour. This really gives the flour time to absorb all of the water. When mixing the dough, I like to use a Danish dough whisk but you can also use a large fork or simply your hands. The goal with this step is to make sure everything is mixed very well with no clumps of flour on the bottom. Really mix it well!
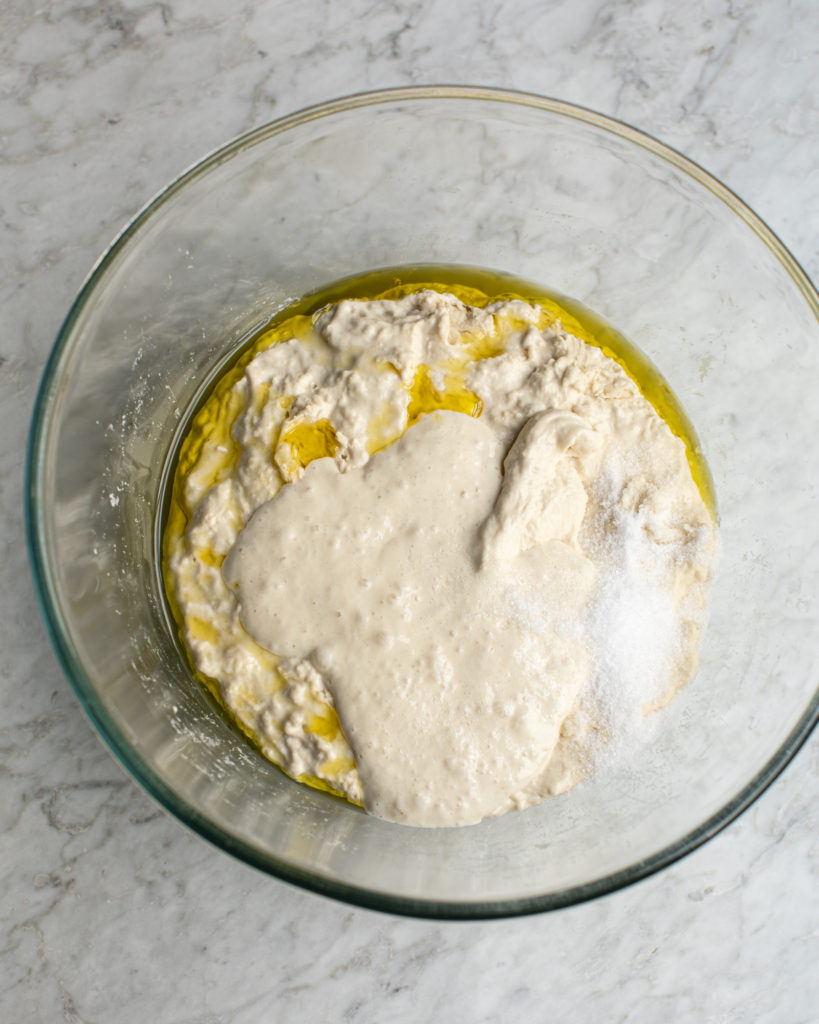
Once autolyse is done, you will notice the dough is nice and stretchy. Now it’s time to add the remaining ingredients: starter, salt, and olive oil. To combine everything, what I like to do personally is a good 5 minutes of kneading using the Rubaud method. This is all done in the bowl with your hands. This is a great way to combine all of the ingredients and make the dough cohesive while developing gluten. Here is a video to check out how to do it.
I like to set a timer when performing this to make sure I do it for a full 5 minutes. It is very important to make sure this is done initially for the best results.
BUILDING STRENGTH IN THE DOUGH
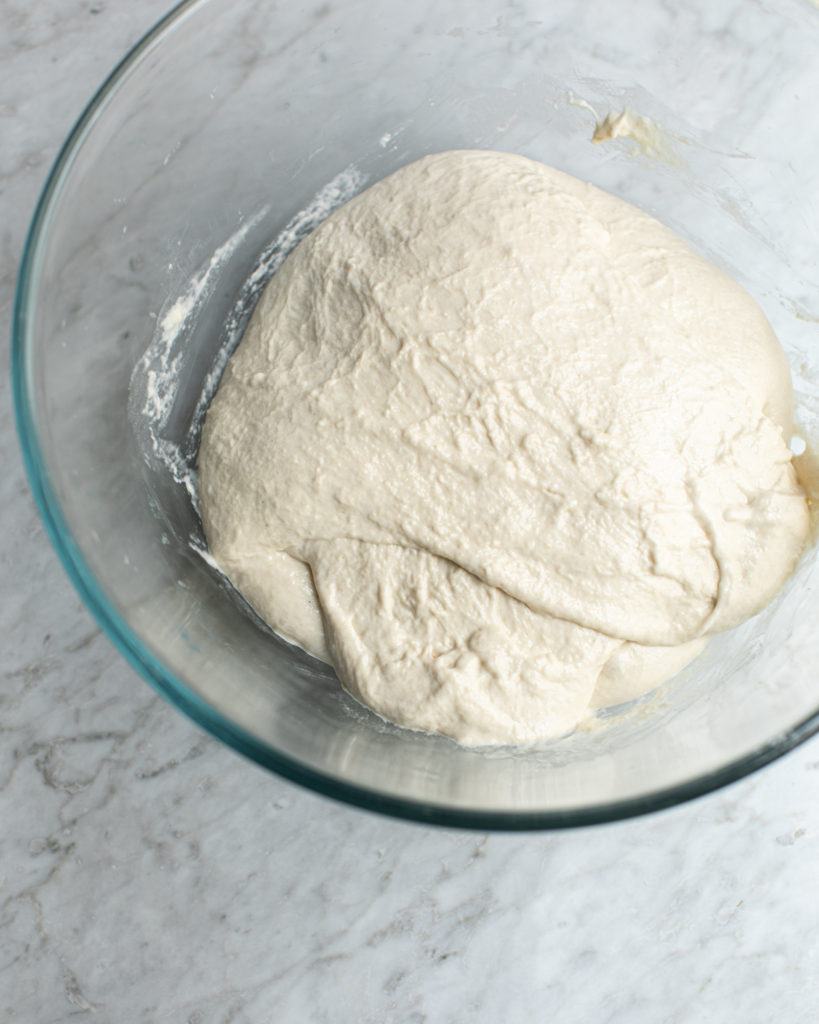
Once this is well combined, it’s all about creating strength which will happen through stretching and folding the dough. There are a million and one ways to build strength in dough but for this recipe, here’s what I like to do:
Once the dough has rested, I like to start implementing stretch and folds in the bowl. This is simply pulling the dough and stretching it over itself to create layers and tension. Here is a video for how to do that. For this, the goal is to pull up and over 4 times, going all around the dough. In between the steps, I like to use a rounded rubber bench scraper (that’s slightly wet) to push down the sides of excess dough to keep things nice and clean (you could use a rubber spatula).
Do note, this focaccia base recipe is a higher hydration dough than the one in the video so the stretching will seem more elastic and not as thick when you do it. I like to wait a good 40 minutes in between each of these stretch and folds because this allows the dough to relax which makes it easier to work with. If you don’t wait long enough, the dough will be more springy and you won’t get a good stretch which will affect your final results. This isn’t a quick 30-minute weeknight recipe people. Chill.
FINAL STEPS
For the final step before the bulk fermentation, I like to perform a coil fold. This basically means to lift the dough up and let stretched sides fall underneath. This creates a nice taught layer at the top of the dough. Here is a video for how to do that. I then like to transfer the dough to a clean and well-greased bowl, preferably one that has a tight-fitting lid to go with it! (You can use the same bowl if you’d like- simply place the dough (after the coil fold) on a damp surface like a cutting board while you rinse the bowl out.
Then dry it, add the oil, and transfer dough in. If you do this, just make sure to spread some water on the surface you place the dough on so it doesn’t stick. (You can also use a bench scraper to help you if you have one.)
BULK FERMENTATION
Once all of the strength building is done, it’s time to let the magic happen: bulk fermentation! This large window of time allows the dough to literally grow and become a living blob. Depending on the temperature of the environment, the dough will grow and fill with gas and become super jiggly. The most important visual cue to let you know it’s ready to bake is when the dough is fully doubled in size. You can do this by leaving the dough on the counter for 10-14 hours. (In the summer, this could be quicker than in the colder months.) To better accommodate your schedule, you can also refrigerate the dough overnight (or for 2 days) and then take it out to let it finish rising on the counter. Do note that by putting the dough in a cold environment like the fridge, it slows the growing process greatly.
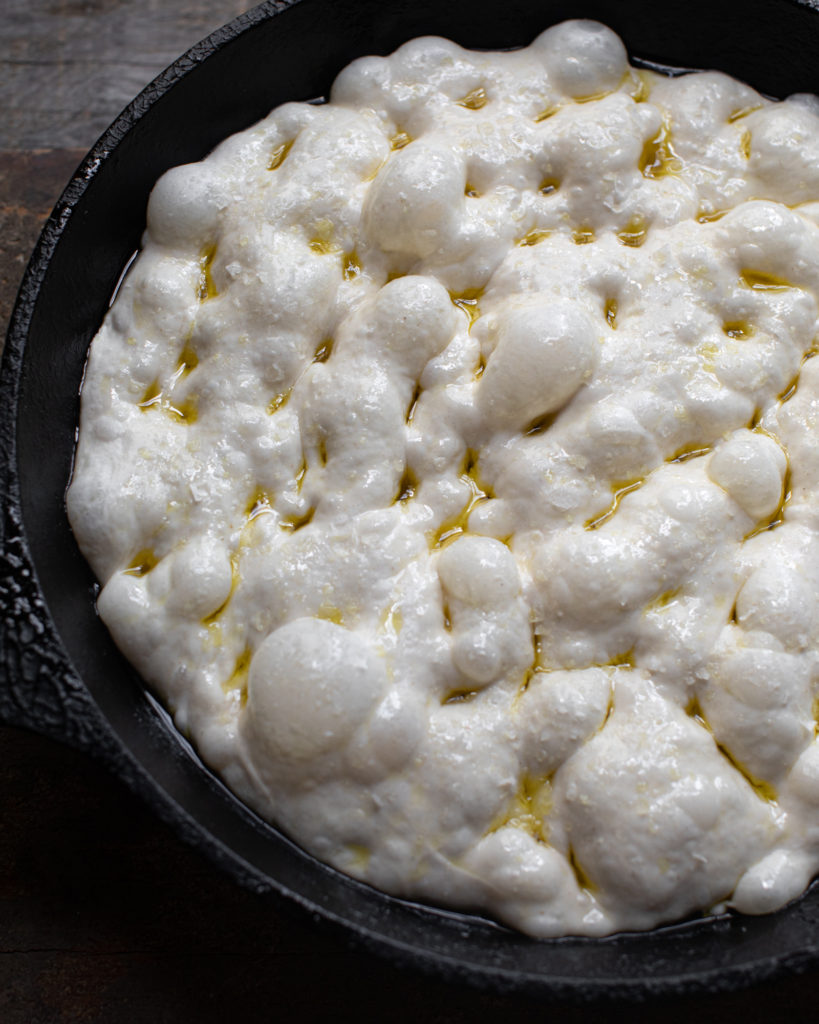
USE A CAST IRON SKILLET FOR A NICE CRISPY CRUST
For baking this sourdough focaccia, I only recommend using a large cast iron skillet for this recipe: ideally 11″, 12″ or 13″ in size.
First, this results in an incredibly golden and crispy crust, especially on the bottom. Second, I believe that the even heat from the thick skillet helps to bake the sourdough focaccia bread very effectively. And third, I love the round shape of the loaf. By using a good amount of olive oil, this will prevent the dough from sticking and the bread will pop right out! Do not skimp on the oil though. Make sure the cast iron is clean and well-greased.
Once the dough has doubled in size in the bowl, simply transfer the dough to a skillet. To do this, drizzle some more olive oil around the sides of the dough and cover your hands with oil. Gently scrape one hand all around the sides of the dough to release it from the sides of the bowl. (You do not want it to stick when trying to transfer or it will de-gas all of those beautiful bubbles.)
Once the dough is released from the sides, use both hands to scoop the dough out of the bowl and plop it in the skillet. I know this might seem overwhelming at first, but just remember the dough is a blob that wants to stay together. Keep things slick with olive oil, move your hands with intention, and treat the dough like a fragile pillow of bubbles, but don’t be scared of it. Even if this process isn’t perfect, the end result will still be delicious. Practice really helps!
DIMPLING THE DOUGH
Now it’s time for the final proofing and to dimple the dough or add your toppings. You can do this with olive oil + well-greased fingers. Simply press your fingers down a couple of times around the surface of the dough. Or you can use your desired toppings to replicate this dimpling. Some options for this are onions, olives, butternut squash, cherry tomatoes, and on and on. I will be rolling out separate blog posts on specific variations for this recipe in the future so, until then, have fun and be creative! The final topping in my kitchen is ALWAYS flaky Maldon salt. This is a must for me. The large flakes of salt are crispy and crunchy. They also make for a gorgeous final touch on this sourdough focaccia.
BAKING THE SOURDOUGH
For baking, I like to use a very high heat of 500 degrees Fahrenheit for this recipe. If you have convection bake, like I do, I would recommend using that. I find that this yields really great results. I have also tested this with no convection and it still works very well. Now, for cooking time, every oven is different, so you need to go off visual cues. It breaks down to basically baking for 10-15 minutes at first, then rotating the skillet and continuing to bake for another 10-15 minutes. The initial 10-15 is going to give the bread its oven spring which is how much it grows.
The final 10-15 minutes is to cook the interior of the dough while giving the crust a beautiful color. I personally like a darker color crust but you can go with a more golden color if that’s more comfortable to you. Once again, every oven is different and so are our preferences- playing with cooking times is an important part of the process, so I can’t give you an exact time. Try it for yourself and see what you like. I have accidentally ‘burned’ my sourdough focaccia in the past. Then realized that I loved the charred look and taste. It’s really up to you. Also note, I have cooked this recipe at 550 degrees Fahrenheit. I also cut back on the cooking time with great results! I believe it was 8 minutes initially, rotated, and a final 8 minutes to finish. Lot’s of wiggle room here, y’all.
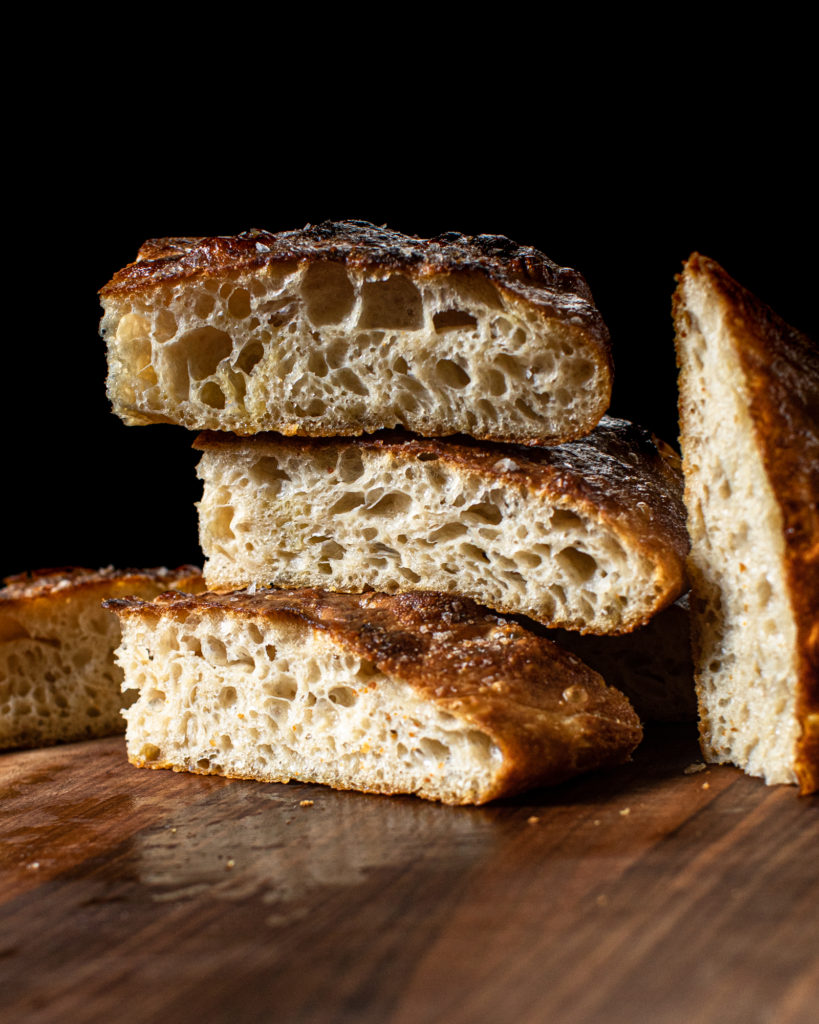
THERE YOU HAVE IT FOLKS!
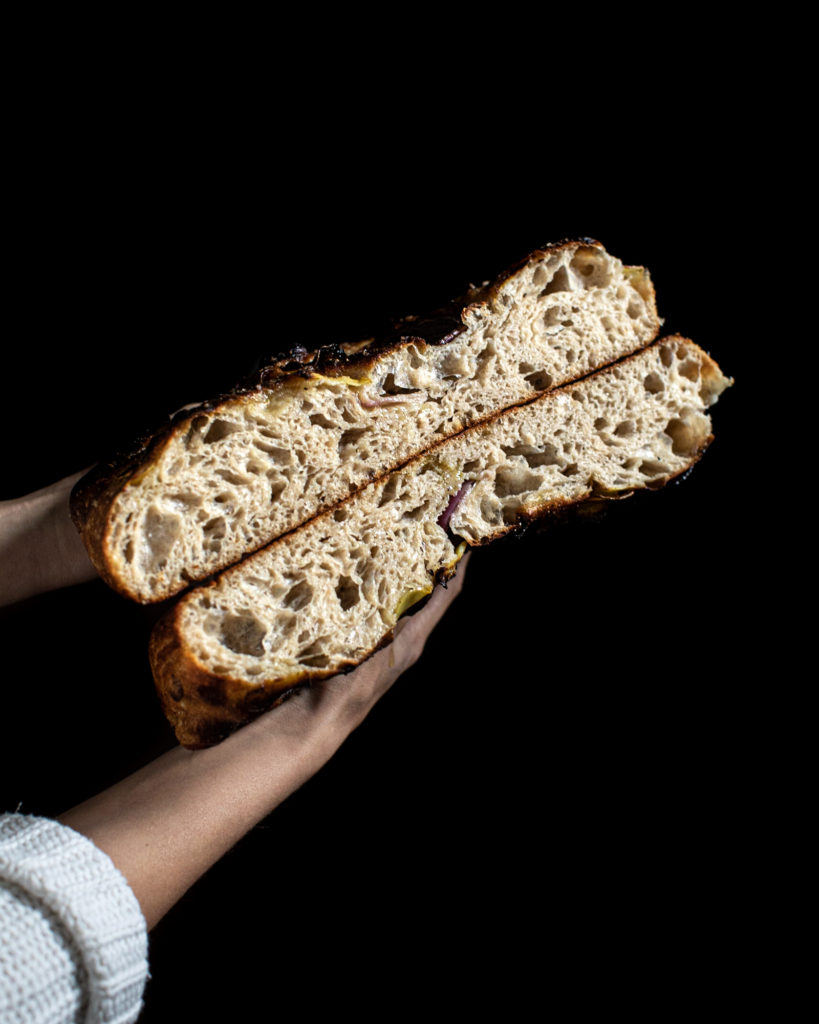
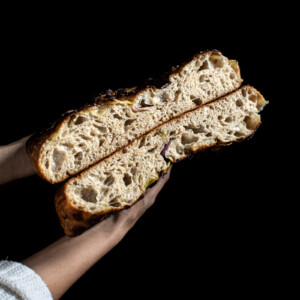
Here we have a 100% 00 flour sourdough focaccia bake! Notice the beautiful crumb structure and the golden crust. This bread is perfect for dipping in more olive oil or making into sandwiches. I also love using it for my Fried Caper Panzanella. Or you can toast it and serve it with avocado and sliced tomato or vegan scrambled eggies with grits. Yum!
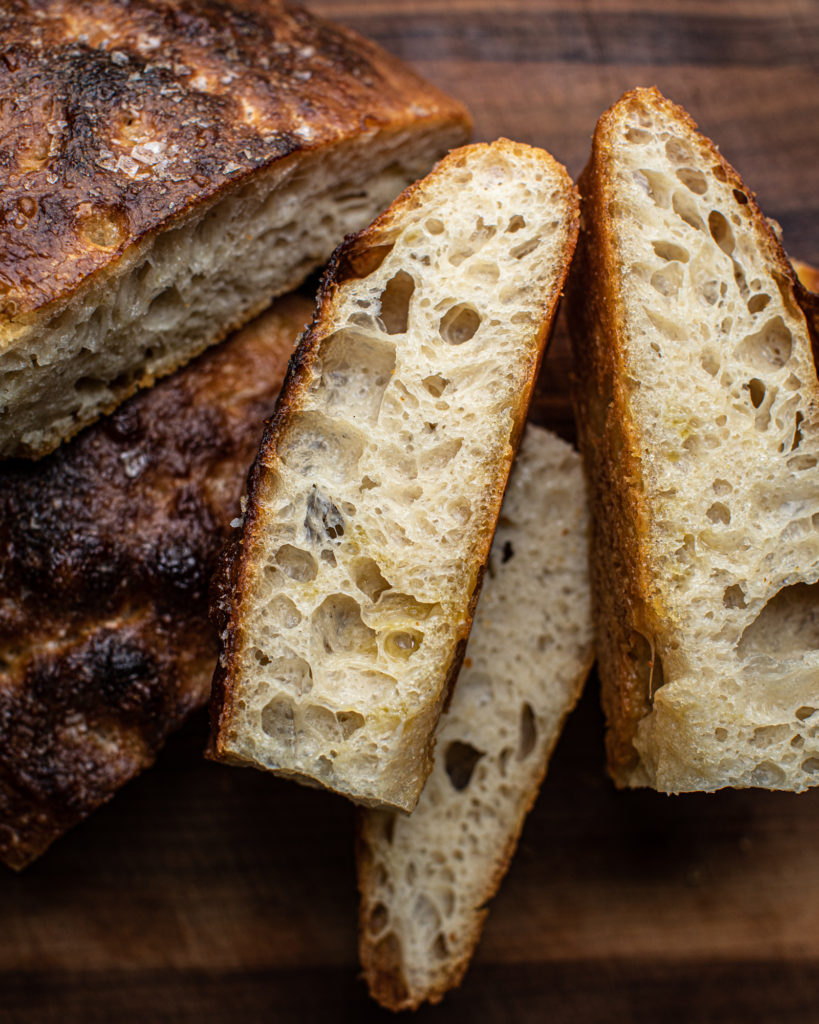
Now just look at that luscious sourdough focaccia bread! Don’t you want some right now!? I hope that you have enjoyed this blog post. I know that it may seem like a lot of information. My goal is to give you a good understanding of the recipe so that you can be confident with your baking.
I HOPE YOU ENJOY MY SOURDOUGH FOCACCIA!
Please remember, this recipe is not about perfection. Even if the dough is slightly under-proofed or over-proofed, a little burnt, or just straight up ugly- it will still be delicious toasted with some butter! And you can always turn it into breadcrumbs. Once you give it a go, you will have a better understanding of sourdough focaccia. The most important thing to remember is to HAVE FUN. I can’t wait to share more variations of this base recipe with all of you. I will also be releasing some videos that will be coming out soon, as well. Until then, happy baking!
If you do try this recipe, please leave a comment and rating below. It greatly helps the health of my site and makes me oh so happy to read. Thank you for being here!
-Timothy
Sourdough Focaccia
Ingredients
- 650 grams flour
- 500 g water
- 80 g active sourdough starter
- 15 g fine sea salt
- 15 g olive oil
- Flaky salt + more olive oil, to garnish
Instructions
- Activate your sourdough starter. In a medium-sized Ball® Jar, add 1 cup water. Then add 1 ½ cups of whatever flour you will be using for the loaf. (For example, if making a loaf of only 00, use only double 00 flour. If making a loaf with rye and bread flour, add equal amounts of those.) Add one teaspoon of sourdough stater, mix well, and cover loosely with a lid or cloth. At this time, you can add a rubberband so you can see the growth happen, which is optional. When the starter has doubled in size and is nice and bubbly, you are ready to make your dough!
- Autolyse! In a large bowl while using a kitchen scale, combine 650 grams of flour with 500 grams of water. (As mentioned before, this could be a combination of bread flour, 00, rye, whole wheat flour, etc.) Mix well, scraping the sides of the bowl thoroughly. Cover with a lid (or a very damp cloth) and let sit for 45 minutes. (You can go longer- I've done an autolyse for 2 hours with great results! It depends on your schedule but I would recommend at least 45 minutes.)
- Add the activated starter (80 grams) + salt (15 grams) + oil (15 grams). Using your hands, squeeze the dough and mix very well. Using the Rubaud method, mix the dough for 5 minutes. Scrape the sids of the bowl down to clean, cover and let sit for 40 minutes.
- Using your hand, grab the dough from one side. Stretch up and gently pull to fold it directly over the dough. Repeat this step 3 more times, moving around all 4 sides of the dough. Cover and let sit for 40 minutes.
- Repeat the stretch, pull and fold in the bowl. Cover and let sit for 40 minutes.
- Repeat the stretch, pull and fold in the bowl. Cover and let sit for 40 minutes.
- Using your hands, coil the dough in the bowl. Place both hands under the dough and gently pull up. Let the sides of the dough fall under the dough you are holding. Twist the bowl and repeat this step so you have some nice tension on the top of the dough. Transfer to a well oiled bowl and cover.
- Let the covered dough sit on the counter at room temperature for 10-14 hours. When the dough has doubled in size and looks supper wiggly and bubbly, it’s ready! (You can also place the dough in the fridge overnight. When ready to bake, simply remove from fridge, place on counter, keep it covered, and let it rise until it has doubled in size. Depending on the temperature of the house, this could take from a few to a couple of hours. The visual cue is when the dough is doubled in size and looks bubbly.
- When ready to bake, using your hands, gently transfer the dough (keeping it upright) to a very well oiled (use olive oil) cast iron skillet. Drizzle some more oil on the surface of the dough and gently press, encouraging it to spread out in the pan (see video for reference). The ideal skillet size for this recipe is 12-13 inches. Use a pizza peel or large baking dish to cover and let the dough rest in a warm spot for about 30 minutes.
- Now it’s time to dimple the dough or add your toppings. If making a plain loaf, simply use your fingers to dimple the dough. Drizzle a good amount of olive oil over top along with a good amount of flaky salt. Cover and let sit for 30 more minutes. Pre-heat the oven during this time.
Baking Options!
- Convection bake 500 degrees F: Bake 10 minutes, rotate, and bake for an additional 10-15 minutes, until desired browning.
- If you have a convection setting, by using this higher temperature you will achieve a more charred and glossy finish of the bread. This is my preferred way of baking this bread because I love the look of it. If you don’t have a convection setting, you have the option below:
- Regular bake 500 degrees F: Bake 15 minutes, rotate, and bake for an additional 10-15 minutes, until desired browning.
- Once the bread is baked (either temp), remove from the oven and let sit for 10 minutes in the skillet. Then, using a large spatula, transfer the bread to a cooling rack and let sit for at least 45 minutes until slicing.
- Eat as is, dipped in olive oil, smothered in vegan butter, or use it to make a fantastic sandwich!
Notes
*Disclosure: This is a sponsored post that is part of an ongoing partnership with the Fresh Preserving Division of Newell Brands. They have provided jars, equipment and monetary compensation. All thoughts and opinions expressed remain my own.
my daughter was so excited on this, I asked her to forward to me as well
So awesome to hear! Thank you and happy weekend!
I’m looking forward to trying this recipe. I have a 10 inch cast iron skillet and a 12 inch stainless steel one. Do you think the stainless steel one would work since it’s closer to the size that you recommend? Really appreciate you sharing your recipes!
Hey Mark! So happy to have you here. My only concern with the stainless steel is that it might stick. Therefore, I would just make two smaller loaves with the 10 inch cast iron. You can easily split the dough in half and bake off the other half at a later time (it will keep tightly sealed in the fridge for up to a week!). You can also use it to make a pizza, too. Happy baking!
Worth it!! I had to make a schedule to make sure my timing would be right because I was making this during the week and also reviving my chilled starter. I decided to do just good ole dimples and salt, but now that I know what to expect, I’m getting back to it this weekend and making one with olives and using some chile infused olive oil on top. I should say, I don’t really bake or make bread; the only loaf of sourdough I’ve ever made was during the pandemic (no my starter wasn’t that old lol) but I’ve had my eye on this recipe and it gave me the push to get back on the bread baking horse! I love this recipe just as I have loved every recipe I’ve made by Timothy, so thank you Timothy 🙂 Highly recommend.
Leah! Thank you so much for the thoughtful message. I am thrilled to hear the loaf worked for you. It is so fun to play with different toppings, so do enjoy that part! Thanks for being here and happy baking. xo T