Incredible Gluten Free Dinner Rolls
Welcome to the most incredible gluten free dinner rolls! As most of you probably already know, I am not gluten free. Not even close. So when my friend Melissa came over for supper one night and showed me these rolls, I was blown away. Don’t get me wrong, I have had some gluten free bread that is good! But most of the time, it’s usually weird in texture, has a long list of odd ingredients that seem almost just as difficult to digest as gluten (LOL!), and is super expensive. Well, not this recipe! It uses only a handful of pantry-friendly ingredients (soaked rice being the main one) and just requires a blender and a non-stick muffin pan to make. The results are the most delectable, golden and crispy on the outside and soft and fluffy on the inside, gluten free dinner rolls.
THE INSPIRATION BEHIND THESE INCREDIBLE GLUTEN FREE ROLLS
Just to be clear, I did not create the foundational recipe for these incredible gluten free dinner rolls, nor did my friend Melissa. She just happens to be gluten free and found this to be her favorite recipe. In regards to where it comes from, I do remember a version of this recipe going viral a few years ago where this batter was made into more of a loaf form. Since then, I have seen many renditions of this bread on the interwebs (here is one of my favorites!). I also recently found a YouTube video of someone making an early American recipe from the 1700’s that is basically the same thing we are making here!
Bottom line, what we are making today is ‘Blender Rice Bread’. It’s a true revelation and a gift to us all! And regardless of where the recipe came from, my friend Melissa and I have streamlined it here for home cooks. This will allow you to have the best results! As for the size and shape, I do think that the texture of this rice bread in a small dinner roll form is just lovely. It really hits the nail on the head if you are looking for a good gluten free bread offering to join the dinner table.
RICE PREPARATION & BLENDING
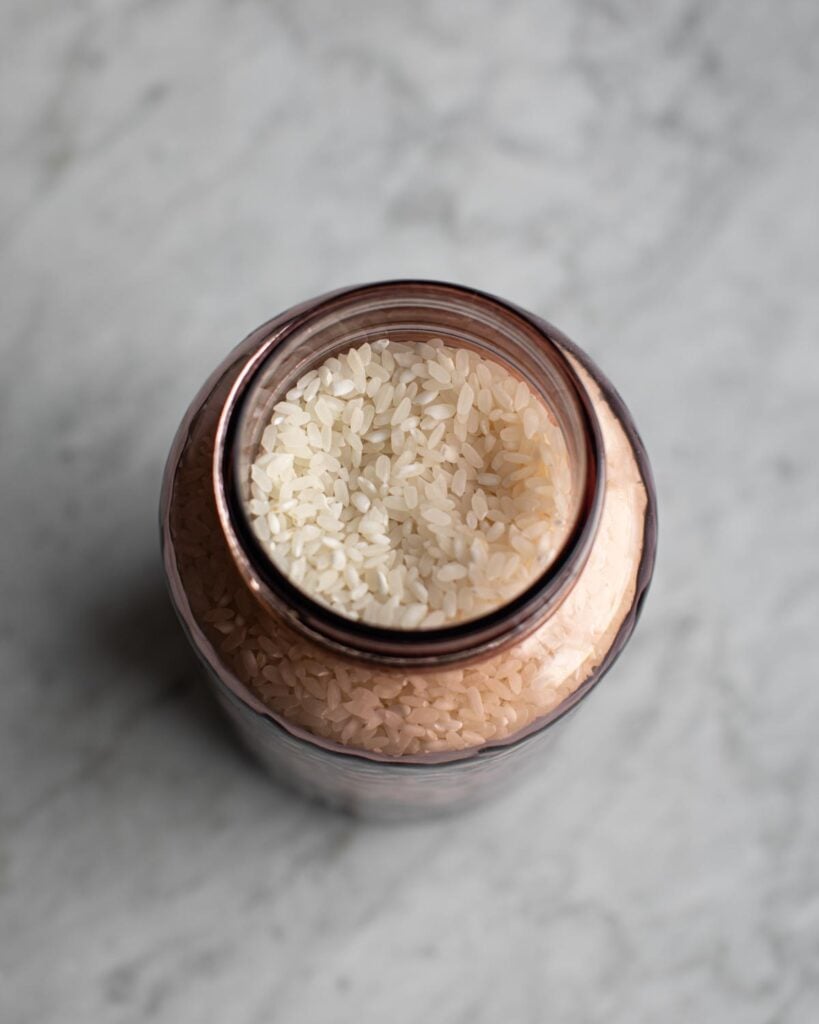
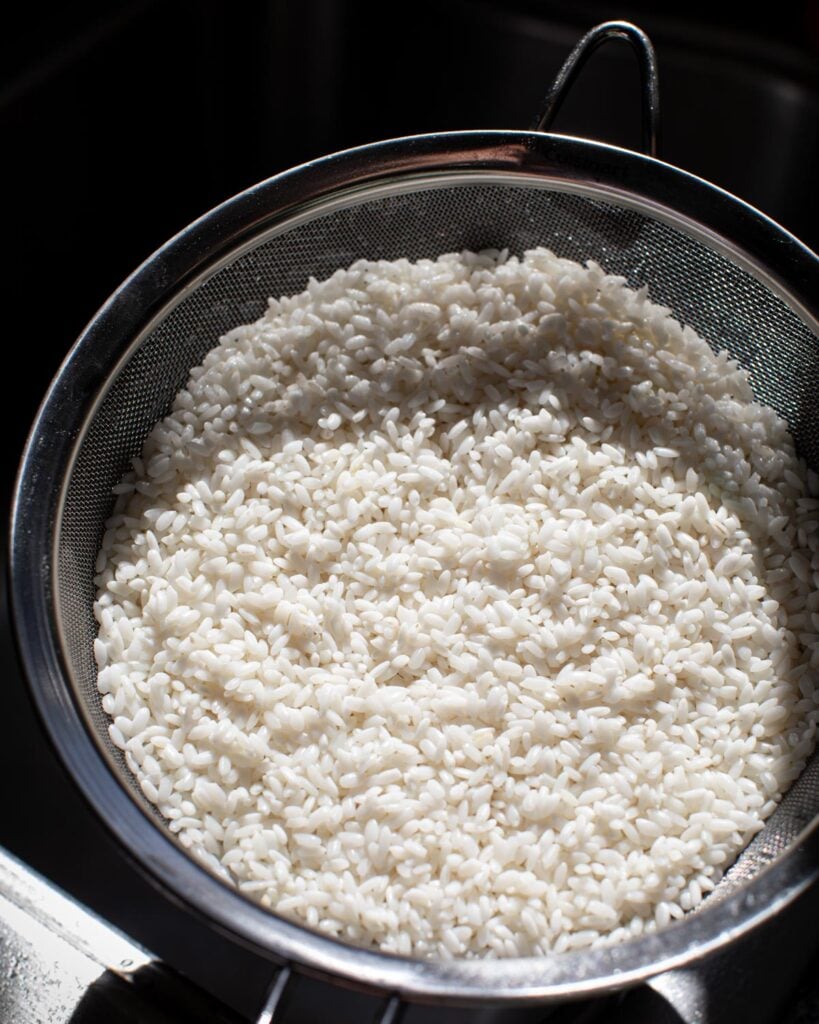
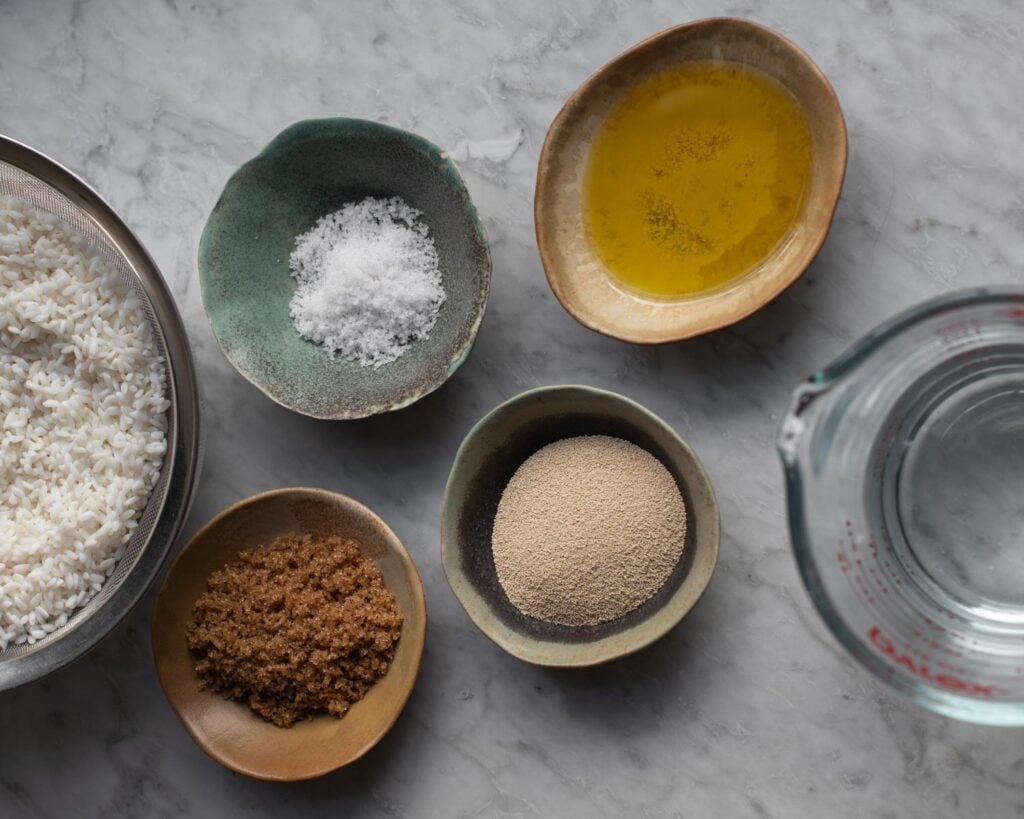
The first and most imporant step is getting your hands on the right rice. Now, I am sure you could use any rice here with decent results. But my friend Melissa has tested this with other varieties and her favorite one to use is Botan Calrose Rice because of its texture, which is more dense and slightly chewy. The next step is soaking the rice. You can do this in a tightly sealed container and keep it in the fridge until you are ready to use. When draining the rice, make sure to set the strainer over a bowl to catch the water. You can use this to fertilize any plants you may have!

USING YEAST FOR THESE GLUTEN FREE ROLLS
For this recipe, we will be using active dry yeast. Make sure to buy it fresh and to check the expiration date to ensure that it’s active. This kind of yeast does like some warmth and some form of sugar to feed on to become active. We will offer both of these because the batter is made by blending the soaked rice with lukewarm water, sugar, salt, and olive oil. By blending the rice for exactly 90 seconds in a high-speed blender, the batter will be warmed up perfectly to make the yeast nice and active. You will notice this once you transfer the batter to the muffin pan. After it sits out for some time, it will nearly double in size!
PLEASE NOTE WHEN BLENDING
Make sure to not go over 90 seconds! If the batter becomes too hot it will kill the yeast and you’ll end up with rice hockey pucks. Not my fault!
GLUTEN FREE BATTER & BAKING TIPS
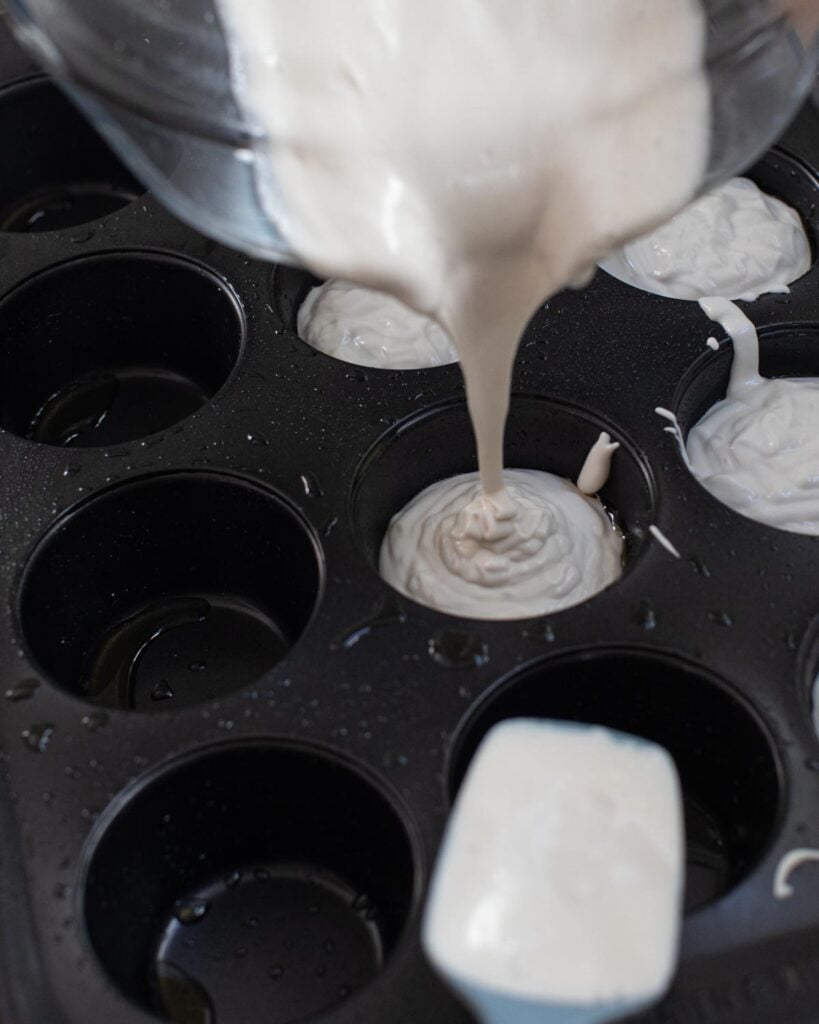
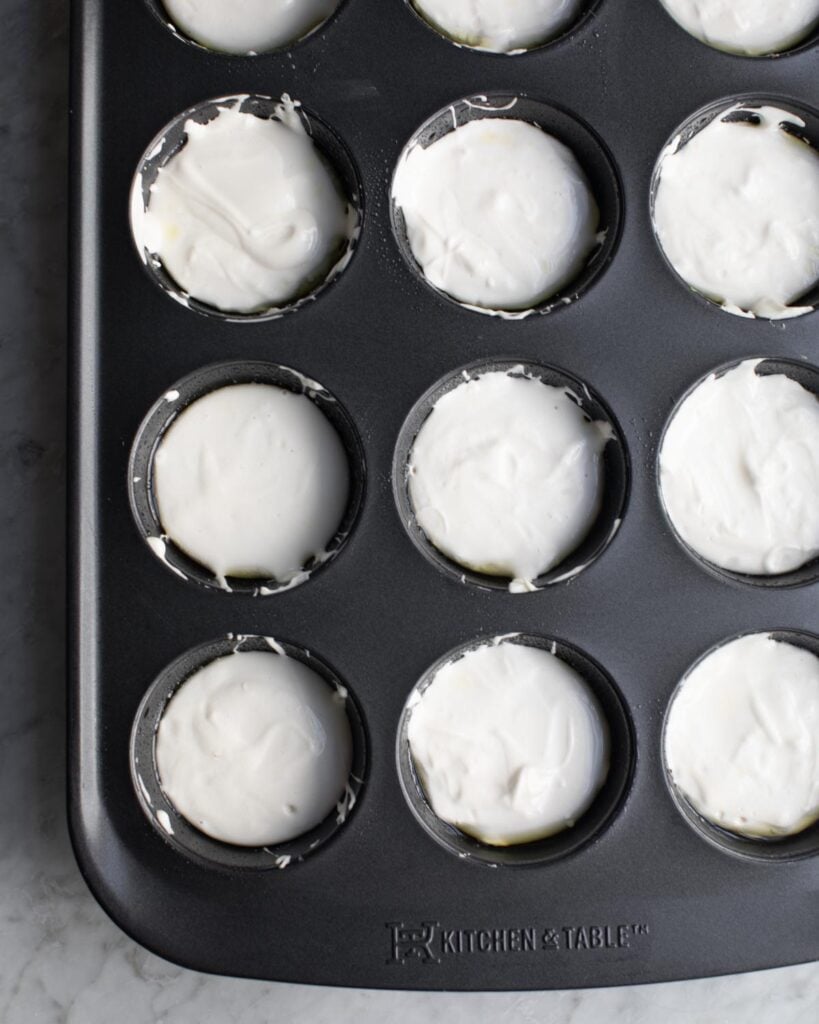
Once all of the ingredients are blended until smooth, you will pour it evenly into a muffin pan. Because this is a gluten free bread, you will want to make sure to prevent sticking as much as possible. You can do this by using a non-stick, dark coated muffin pan in addition to greasing each cavity with oil or butter. Once the batter is transferred, I recommend spraying the tops with some water to prevent them from drying out while they rise.
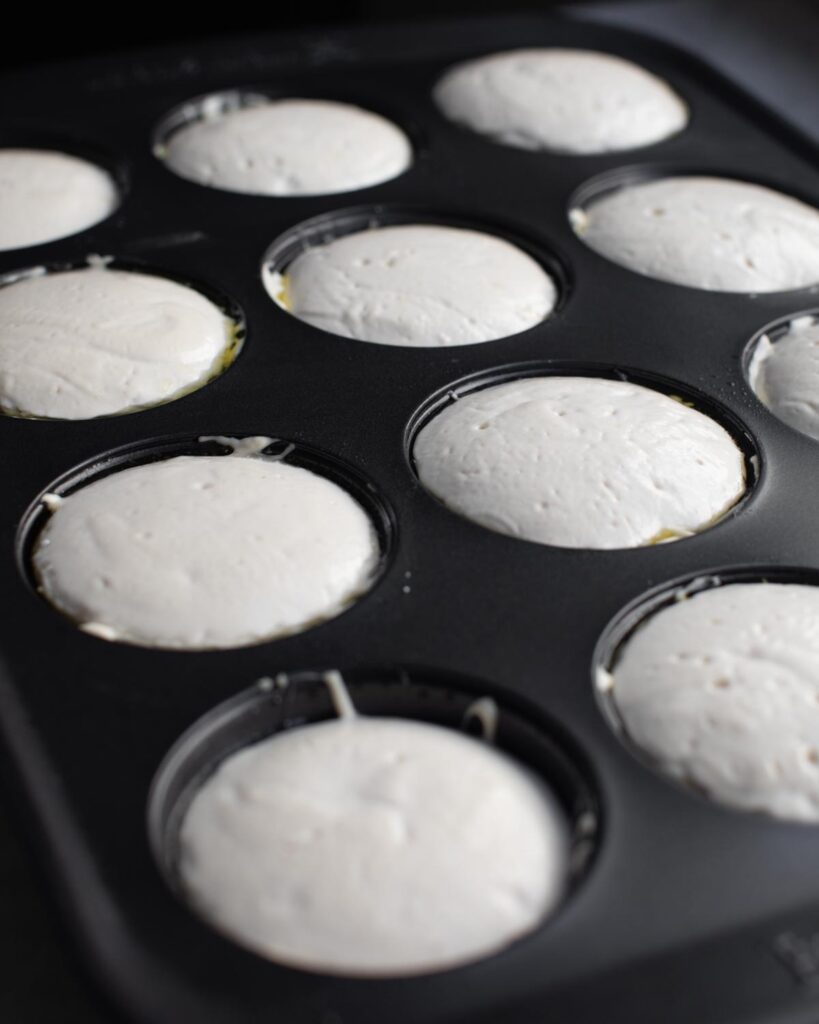
LET THE BATTER RISE
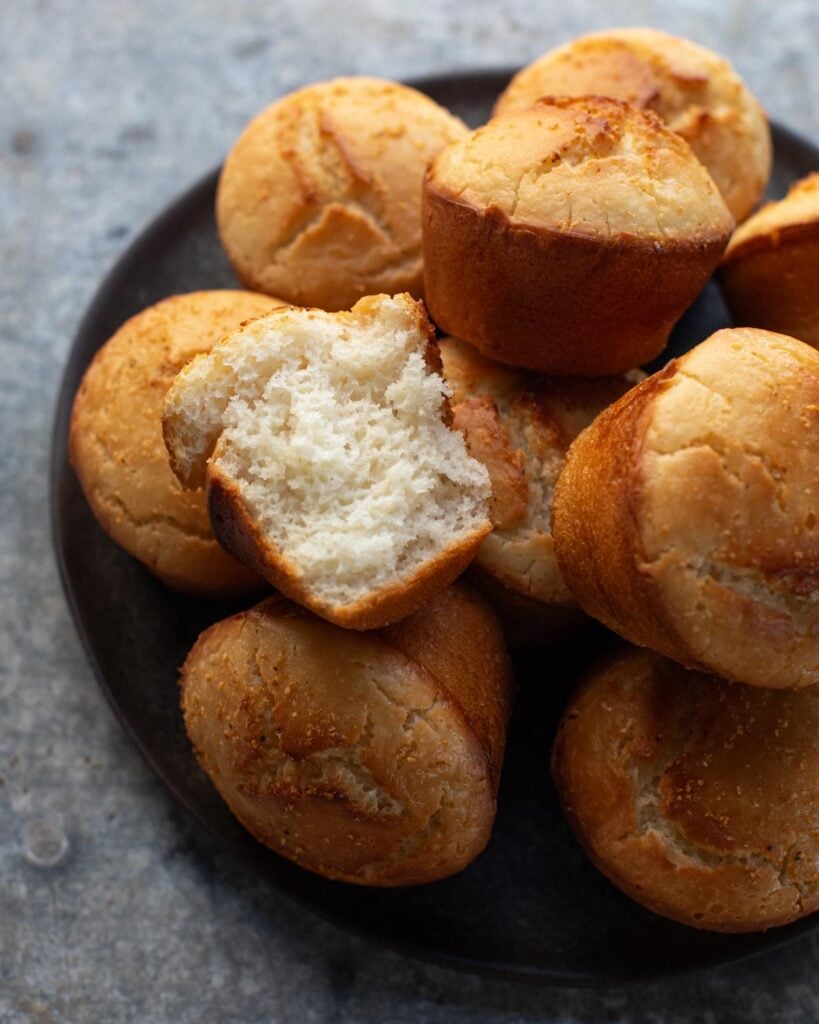
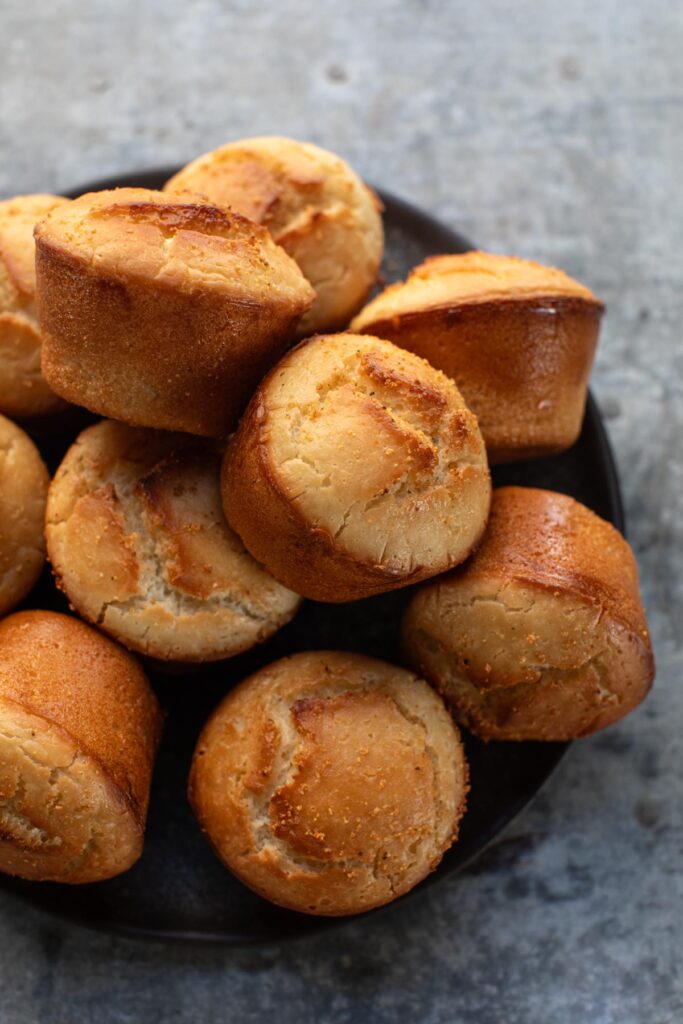
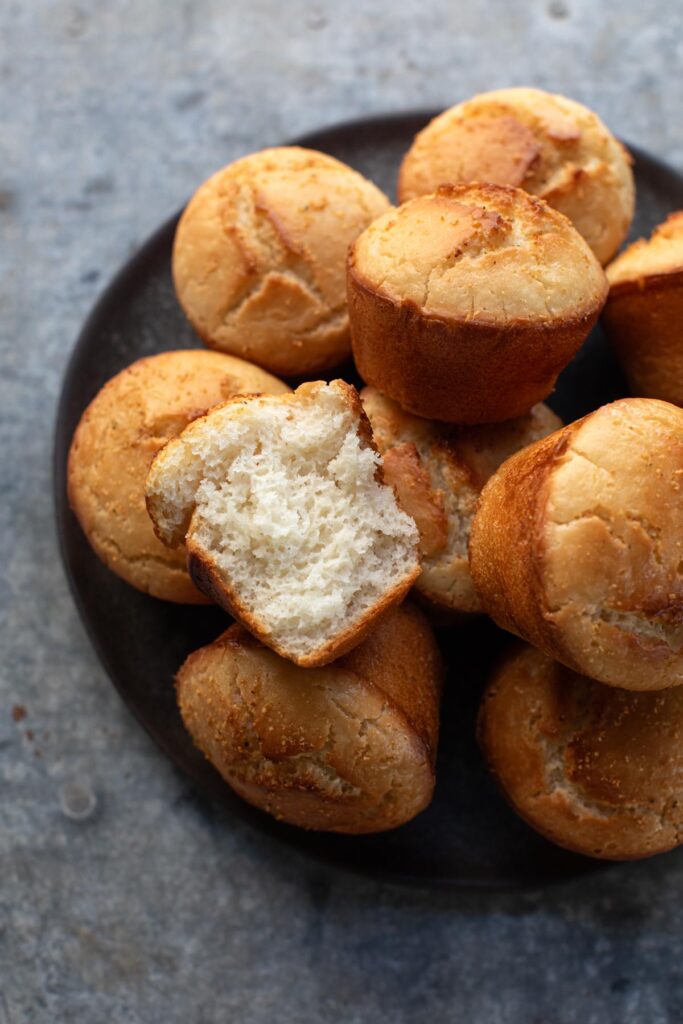
Once the batter has risen to slightly above the tops of each cavity and the oven is piping hot- you are ready to bake! After the rolls have baked for 15 minutes, you will remove them from the oven, brush them with some garlic butter, and return them back into the oven, rotating the pan, to cook for an additional 10 to 15 minutes. The visual cue here is that gorgeous golden brown color you see below. Cracking on the top is totally normal and I think it’s quite beautiful.
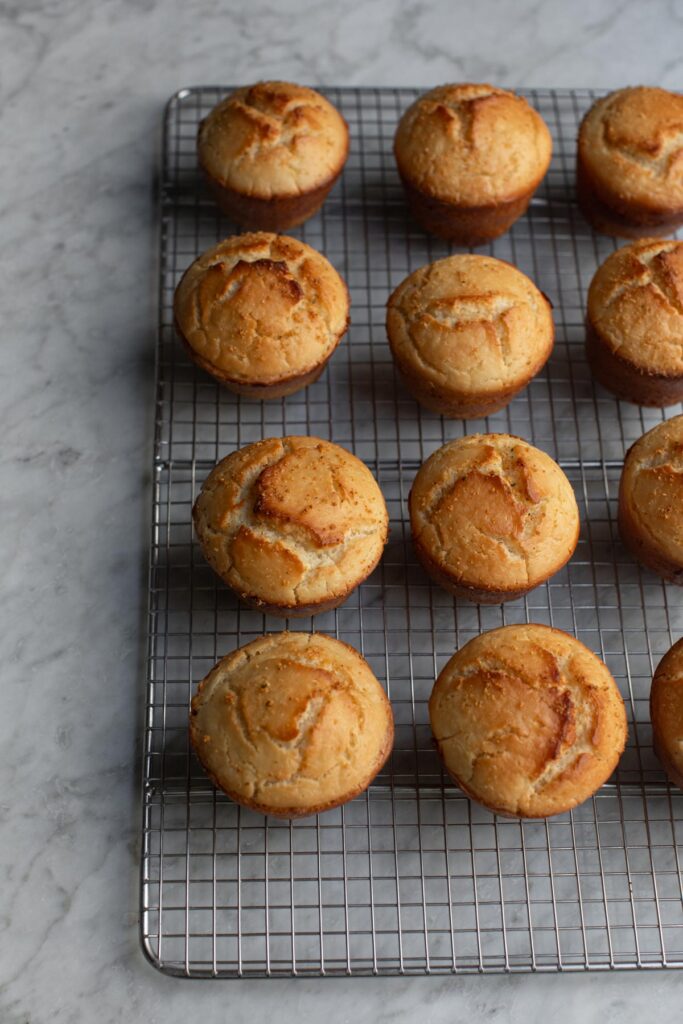
LET THE ROLLS COOL
Once these incredible gluten free dinner rolls are done, I do like to let them cool on a wire rack. This way they crisp up nicely and it encourages the interior to set. My friend Melissa also wanted me to point out one more thing. If you let the rolls cool for a couple of minutes in the muffin pan, it will create a more chewy texture that you might like! There is plenty of wiggle room to play with for this recipe. Have fun and push and pull things to your liking. For example, I wrapped some leftover rolls in a kitchen towel and kept them in the fridge for a few days. Then I sliced them in half, toasted them up, and smothered each half in vegan butter. Not as amazing as fresh but still very enjoyable!
I hope that you enjoy these incredible gluten free dinner rolls! If not for yourself, maybe for one of your guests that happens to be gluten free. What a treat that would be for them! I personally love this recipe so much that I will be making it for my Thanksgiving table this year. And I am not even gluten free! That’s how much I love them.
IF YOU LIKED THESE INCREDIBLE GLUTEN FREE DINNER ROLLS, CHECK OUT THESE OTHER RECIPES
Zuppa Toscana
Gumbo
Pepper Jelly
If you do try this recipe, please leave a comment and rating below. It greatly helps the health of my site and makes me oh so happy to read. Thank you for being here and happy cooking, y’all.
-Timothy

Incredible Gluten Free Dinner Rolls
Ingredients
- 2 cups white short grain rice, soaked (406 g)
- 2 ½ teaspoons sea salt, 10 g
- 3 packs Fleishmann's active dry yeast, 21 grams total or 2 ½ tablespoons
- 2 ½ tablespoons brown sugar, 25 g
- 4 tablespoons olive oil, 45 g
- 1 cup lukewarm water, 236 g
- 3 tablespoons salted plant butter, melted (to brush on top) (42 g)
- ½ teaspoon garlic powder, 1.5 g
Instructions
- Cover the rice with water in quart container or tupperware container with a lid and soak for at least 1½ hours or overnight in the fridge.
- Once the rice is ready, preheat oven to 365°F and set the baking rack to the center of the oven. Generously grease a nonstick muffin tin with olive oil and set aside.
- In a large mesh strainer, over a bowl, drain the rice and use leftover water to fertilize any plants. Rinse the rice for about 15 seconds under running water (the water does not need to run clear!). Shake off the excess water and add rice to a high-speed blender along with salt, brown sugar, yeast, oil, and lukewarm water. Blend at the highest speed for exactly 90 seconds (no more than this or you will kill the yeast!) and pour the batter evenly into the greased muffin pan. Feel free to use a spoon to help scoop and distribute the batter so that each cup is filled the same amount.
- Tap the pan on the counter a few times to even out the batter. Wipe any dribbles to clean the top of the muffin pan (don’t worry about the interiors of the cups, as the batter will rise). Using a water-filled spray bottle, pump 3 mists of water on top of each cup to prevent the surface from drying out. Let the filled muffin pan sit in a warm place until the batter rises just above the top of each cup, about 15-25 minutes. Place in the center of the oven and bake for 15 minutes.
- While baking, in a small bowl, combine the melted butter with garlic powder. Mix well and set aside. After 15 minutes, remove from the oven and brush with garlic butter. Return back to the oven, rotating the pan to encourage even browning, and continue to bake for an additional 10 to 15 minutes, until the tops are golden brown.
- Once baked, immediately and gently lift the rolls from the pan with the edge of a spoon and allow to rest on a cooling rack for about 5 minutes. This will allow the outside to become crisp and the inside fluffy and soft. These are best enjoyed fresh, while still warm, with more butter.
Thanks, I am gluten free and I can’t wait to try these rolls.
I hope you love them!
You’ve done it again. My daughter and I are both vegans but she is also gluten-free and she sure misses her bread. This recipe seemed so kooky, I had to try it and it was the biggest hit on the Thanksgiving table. Thank you so much for sharing -she was happy as a clam to actually be eating a delicious little piece of bread And it was really kind of fun to make.
Aww, this made my day! I know how it feels to be left out at the dinner table. I was hoping that these rolls would really hit the spot for someone wanting a dinner roll that was GF so I am very happy to hear this! Happy holidays, y’all!
How did a white liquid turn into a dinner roll????? Amazing! They tasted great, crunchy on outside and soft in the middle. They do become less crunchy as you let them sit ( hours/overnight), but they are still tasty. I will definitely make this recipe again!
Haha, I know- it’s magic! So happy to hear you liked them!
These are incredible! Gluten affects my husbands joints but he loves bread so I was really hoping these could be a good substitute. They were even better than I hoped for! Mississippi Vegan, you did it again!
Ayy, so happy to hear this! Thank you for letting me know. Happy weekend!
Historically, we’ve always eaten gluten but we are trying a few months gluten free to see if it helps our son. I am so very much missing my bread and baking in general. I plan on giving these a shot as written and also trying a batch with brown rice as well… unless you workshopped it already and it didn’t work. Have you?
Thanks so much!
BTW, your soy curl recipe has created such a stir in our household that I just ordered a 12lb box of curls from Butler!
Oh gosh, that makes me so happy to hear about the soy curls! Ok, I HAVE tested these with brown rice and the results have been mixed. They are more dense and I do like them but they are not nearly as good as with white rice. I would try this recipe first with white and then experiment with brown. I did like them but one time they were way too dense and the other time they were not as dense but still not perfect so I need to figure that out before I can recommend. Also, if you could just copy and paste that blurb about the curls on that post, it greatly helps my web traffic and I would appreciate it. Thank you for being here!! Happy cooking.
I LOVE this recipe but I’ve had to make some small adjustments to get it perfect. Firstly, 3 packets of yeast was far too much for me the first time. The dough ballooned and tasted super strongly of yeast after baking. I live in Hawaii so the temp in my kitchen is typically 75-80 F, if you are working at a similar temp and your yeast is fresh then I recommend reducing to 2 packets (14g). That amount still provided plenty of rise and a classic yeasty roll flavor. Even with reducing the yeast, a rise time of ~20min was a bit much for me, I recommend checking the progress every 5-10 minutes, the perfect rise is around 10min in my climate. Lastly, I will never ever ever make this recipe without muffin liners again! I did that the first time and despite greasing the pan very generously, they were almost impossible to get out intact. I ended up squeezing, squishing and crumbling most of them in the attempt. Now I use paper liners (and still grease very well as that helps them to get golden). Make sure you grease the top of the pan between the muffins cups as well, because your batter may overflow on the tops a bit and that part can get very crunchy/stuck if it’s not greased well. With following these steps, my rolls are absolutely fantastic. The texture is so light, fluffy and airy with a slightly crisp, buttery golden crust. I’m so happy I found this recipe! Thank you Mississippi Vegan!
Hi Jessica! Thank you for all of this wonderful insight. I am glad you figured out what works best for you!! I will say, my muffin tin is a new non-stick and they just pop right out when I make them but I think liners are a great option, as well. Also, I agree, the temperature of the kitchen does make a huge difference in how fast they rise. Haven’t tested these with only 2 packs of yeast but will look into it. Happy cooking!
I tried these because I was curious about how they would taste with such simple ingredients and the results tasted great! The bad news is, they absolutely fused to my pan. I used a non-stick pan and sprayed with cooking spray but they were so stuck i had to destroy almost all of them to get them out…any ideas? I soaked the rice for 24hrs-ish – could it have been that? The flavour was so good I’d love to try again…maybe better luck in a loaf pan? Halp, lol.
Hi Kathy! I am sorry, that is so frustrating! I have made this recipe a couple of times in 2 different non-stick pans and they came out beautifully. I am worried that your pan might be the culprit. I recommend using a dark coated non-stick muffin pan. I just picked one up from Marshall’s the other day for about $15 and it worked amazingly! Or you could find a top rated one on Amazon. I do think that a regular muffin tin would result in lots of sticking. Anyways, I hope that you try this recipe with a new pan because they are truly incredible! Hope this helps, t
I was not expecting my non-gf family to love these as much as they did! The recipe is perfect and easy to follow . Who doesn’t love a no knead bread recipe?! You won’t regret trying this.
Hi Megan! I totally understand what you mean. I was a bit skeptical when I first heard about these but once I tried them- I was impressed. Instead of tasting gluten free, they just taste like their own kind of bread! Even as someone who is not GF, I will make them again and again. Thanks for letting me know your thoughts. Happy holidays!
I’m following a plant-based oil-free diet; would this recipe successful without oil?
Hi Lona! I have not tested this recipe with no oil so I am no 100% certain. I do think that it would still work and that the texture would just be a bit different, but I have not tried this so I am not sure. Please let me know if it works for you!
Tim did it again!! These GF dinner rolls are INCREDIBLE! I must admit that I didn’t have high hopes as I’ve never had decent results baking gluten free BUT these rolls are the exception. So very easy to prepare and so magical to enjoy. They are crispy on the outside, buttery soft on the inside AND loaded with flavor. This recipe is absolutely phenomenal—worthy my best sourdough bread company friends! Yummy!
Ida! Thank you so much for the lovely comment. I was excited to share this recipe with the world and I am so thrilled to hear you had great results. Thanks again and happy holidays!
The best tasting dinner roll ever! Results are just as pictured. I’ll be making lots of these in the future . Been looking for a great gluten free recipe for quite awhile and this is it! Thank you.
So, so happy to hear this!! Thank you for letting me know. Happy baking!
What timing! My husband was just diagnosed with celiac disease, so gluten is poison to his body. Our vegan diet has really helped us with this transition, but I am really missing my homemade bread (especially sourdough). I completely trust your taste buds, so this recipe is super exciting. Going to make these this weekend. Thank you!
Hi Amanda! I am so excited for you to try these dinner rolls. They are truly fantastic!
Hey there!!! Update since I posted here a couple of years ago: I’ve been making these rolls ever since you posted the recipe – love them so much! I just used them to make a gluten-free stuffing and they worked perfectly! Thanks so much for sharing these. Hope you’re having a lovely Thanksgiving ☺️
Aww, Amanda. This made my day! I am so thrilled to hear that you like these rolls and that they work for stuffing. That is great to know! Thank you for being here. Happy Thanksgiving!
Is the 406g of rice before or after soaking? Because the botan rice bag says 45g per 1/4 c which would be 360g for 2 c.
Hi there! I just measured one cup of dried Botan rice and my scale is saying 1 cup is 202 g. So 2 cups would be 406 g. For this recipe, I would stick to the measurements listed in the recipe because that is what is tested and ignore the bag. And to answer your question, the 406 g of rice is dried and is unsoaked. Hope this helps and happy baking. LMK how they turn out!
where can I get to buy.
Hi! I’m sorry but I’m confused- can you please explain more?
I have 2 questions: could I freeze these for Thanksgiving and could I use less salt, like 1/2 teaspoon of kosher salt? Thank you.
Hi! So I haven’t tested freezing them but I do think that it would be ok as most bread can freeze beautifully (including gf bread) and they do store well in the fridge. You could use less salt and it won’t effect the texture but the flavor will be a bit bland.